Cleaning hoverboard wheels safely at home involves powering off the device, removing loose debris, gently scrubbing with a mild soap solution, rinsing, and thoroughly drying all components. This process, which takes approximately 30 minutes, prevents dirt and grime buildup that can hinder performance, reduce battery efficiency, and pose safety risks, ensuring your hoverboard remains in optimal condition for a smooth and safe ride.
Why Proper Hoverboard Wheel Cleaning Matters
Ignoring grime on hoverboard wheels leads to increased friction, draining the battery faster and reducing efficiency. This buildup also causes premature wear on critical components like wheel bearings and motors, leading to costly repairs. Regular cleaning is essential for preventive maintenance, ensuring consistent performance, extending the hoverboard’s operational life, and maintaining optimal grip and stability for safe rides.
Essential Tools and Materials
Before you begin the cleaning process, gathering the right tools and materials is crucial for an effective and safe operation. Using the correct supplies will help you achieve a thorough clean without damaging your hoverboard’s components. For expert hoverboard sales reviews on this site.
Here’s what you’ll need:
- Soft Brush or Old Toothbrush: Ideal for dislodging loose dirt and reaching into the wheel treads and other tight spots.
- Microfiber Cloths: Have at least two—one for applying the cleaning solution and another for drying. Microfiber is gentle yet highly absorbent.
- Mild Soap or Gentle Cleaning Solution: Dish soap is usually sufficient. Look for solutions free of harsh chemicals, abrasives, or solvents.
- Warm Water: For mixing with soap and dampening cloths.
- Dry Towel: For thorough drying after cleaning.
- Optional: Compressed Air: Excellent for blowing out dust and stubborn debris from crevices without moisture.
- Optional: Cotton Swabs: Useful for incredibly tight spots and detailed cleaning around the wheel hubs.
It’s vital to emphasize the use of mild cleaning agents. Harsh chemicals can degrade the rubber of your wheels, damage plastic components, or corrode sensitive electronics, leading to more harm than good. Always prioritize gentle solutions and soft tools to protect your hoverboard.
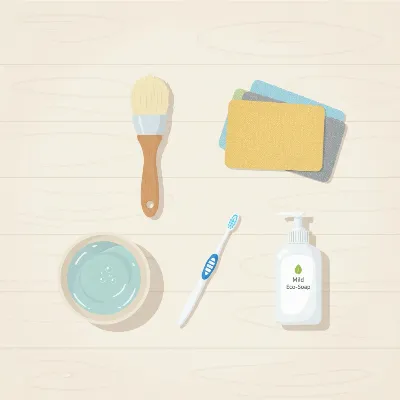 Essential tools for safe hoverboard wheel cleaning at home
Step-by-Step Guide: Cleaning Your Hoverboard Wheels
Cleaning your hoverboard wheels is a straightforward process when approached systematically and with safety in mind. Follow these steps for a sparkling clean and well-maintained ride.
Step 1: Prioritize Safety – Power Off and Secure
Before touching your hoverboard with any cleaning supplies, the absolute first step is to ensure it is completely safe to handle. Always turn off your hoverboard by pressing the power button until it shuts down, and unplug it from any charging source. Place the hoverboard on a stable, flat surface to prevent it from rolling or tipping over during cleaning. This minimizes the risk of accidental activation or movement, protecting both you and the device.
Step 2: Clear Away Loose Debris
|
Our Picks for the Best Hover Board in 2026
As an Amazon Associate I earn from qualifying purchases.
|
||
| Num | Product | Action |
|---|---|---|
| 1 | K1 Go-Kart Seat Attachment for Self-Balancing Scooters, Adjustable Frame Fits 6.5"/8"/10" Boards, Easy Install, Kids & Family Fun (Scooter Not Included)–Classic Black |

|
| 2 | 8.5” All Terrain Hover Board, Off Road Self Balancing Scooter with Bluetooth and LED Lights, UL2272 Safety Certified |
|
| 3 | Gyroor Self Balancing Scooters Seat Attachment - Go Kart Conversion for 6.5'' to 10'' Self Balancing Scooters, Adjustable Frame Length, Perfect for Kids and Adults |
|
| 4 | Hover-1 My First Self Balancing Scooter for Kids with 5 mph Max Speed, Dual 150W Motors, 6.3” Tires, 3 Miles Max Range, and LED Headlights |
|
| 5 | LIEAGLE Hoverboard, 6.5" Self Balancing Scooter Hover Board with Bluetooth Wheels LED Lights for Kids Adults |
|
| 6 | INMOTION E20 Electric Unicycle Hoverboard for Beginners – 14" Wheel, 900W Motor, 18.6 Miles Range, 12.5mph, UL2272 Certified – Lightweight & Safe Self-Balancing Scooter |
|
| 7 | K2 Self-Balancing Scooter Go Kart with Rear Shock Absorption, Balancing Scooter Seat Attachment for 6.5" 8" 10" Tires, Adjustable Length & Off-Road Wheel( (Not Including Balancing Scooter) |
|
| 8 | Self-Balancing Scooter Skin Hoverboard Sticker Adult e Scooter Electric Scooter for Adults Reflective |
|
| 9 | Razor Hovertrax 2.0 Hoverboard, UL2272 Certified Self-Balancing Hoverboard Scooter, for Kids Age 8+ |
|
| 10 | Self Balance Scooter Seat Attachment 6.5” Two-Wheel Self Balancing Electric Scooter with LED Light Flash Lights Wheels |
|
Once your hoverboard is safely powered down and secured, begin by removing any large, loose debris from the wheels. Use a soft brush, a dry microfiber cloth, or even your hands to pick out visible dirt, hair, small pebbles, leaves, or any other foreign objects stuck in the wheel treads or around the wheel wells. For more stubborn particles lodged deep in the grooves, a blast of compressed air can be incredibly effective at dislodging them without physical contact. This initial step prevents you from inadvertently grinding abrasive materials into the wheels during the wet cleaning process.
Step 3: Prepare Your Gentle Cleaning Solution
With the loose debris gone, it’s time to prepare your cleaning agent. In a small bowl or bucket, mix a few drops of mild soap (like dish soap) with warm water. Stir gently until you have a slightly sudsy solution. It is crucial to avoid harsh chemicals, abrasive cleaners, or industrial solvents, as these can strip away protective coatings, damage the rubber, or corrode the internal mechanisms of your hoverboard. A gentle, diluted soap solution is all that’s needed to effectively lift grime without causing harm.
Step 4: Gentle Scrubbing for Spotless Wheels
Now, dip one of your microfiber cloths or the toothbrush into the prepared soapy water, making sure it’s damp, but not dripping wet. Gently begin scrubbing the hoverboard wheels, paying close attention to the treads, sidewalls, and the edges where dirt often accumulates. For intricate areas and tight crevices around the wheel hub, the toothbrush or cotton swabs dipped in the solution will prove invaluable. to scrub with light pressure; the goal is to loosen and lift grime, not to abrade the material. Crucially, avoid saturating the wheels or allowing excessive moisture to seep into the internal electronic components, as water damage can be detrimental.
Step 5: Rinse and Thoroughly Dry
After scrubbing, it’s essential to remove all soap residue. Dampen a clean microfiber cloth with plain warm water (no soap) and gently wipe down the wheels to rinse away any remaining suds. Repeat this process until all soap film is gone. Once rinsed, immediately grab your dry towel and meticulously dry the wheels. It is paramount to ensure the wheels are completely dry before using or storing your hoverboard. Any residual moisture can lead to corrosion of metal parts, damage to electronics, or promote mold and mildew growth. Air dry for a short period after towel drying to ensure every crevice is free of dampness.
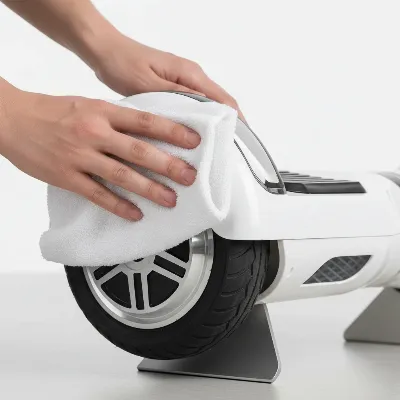 Thoroughly drying hoverboard wheels after cleaning to prevent damage
Step 6: Final Inspection for Wear and Damage
The cleaning process isn’t truly complete until you perform a final inspection. Take this opportunity to closely examine your hoverboard wheels for any signs of wear, tear, or damage that might have been hidden by dirt. Look for cracks in the rubber, uneven tread wear, embedded sharp objects, or any loose components around the wheel hubs. Addressing these issues early can prevent more significant problems and ensure your hoverboard remains safe to ride. If you spot any significant damage, consider having it professionally inspected or repaired before your next ride.
Deep Cleaning Tips for Stubborn Grime
While routine cleaning handles most dirt, sometimes your hoverboard wheels encounter particularly stubborn grime or mud that requires a bit more effort. For a monthly deep clean, or after an adventurous off-road ride, consider these additional tips:
If you find caked-on mud or sticky residue, let it dry slightly first, then gently scrape off the largest chunks with a plastic scraper (like an old credit card) or a stiff-bristled brush. Follow up with your mild soapy solution. For extremely tight spaces around the wheel axle or inside protective casings, compressed air can blow out dust and fine particles that cloths can’t reach. It’s also a good time to thoroughly inspect for any small stones or debris that might be deeply embedded in the tire treads, carefully prying them out if safe to do so.
Common Mistakes to Avoid While Cleaning
To safeguard your hoverboard and ensure a successful cleaning process, be aware of common pitfalls:
- Hosing Down or Submerging: Never, under any circumstances, hose down your hoverboard or submerge any part of it in water. Hoverboards contain sensitive electronics that are highly susceptible to water damage, even if advertised as “water-resistant.”
- Using Harsh Chemicals: Avoid abrasive cleaners, strong detergents, alcohol-based solutions, or petroleum-based solvents. These can corrode components, discolor plastics, and degrade the rubber of your tires.
- Over-Saturating with Water: When scrubbing, ensure your cloth or brush is only damp, not soaking wet. Excessive moisture can drip into internal components and cause shorts or long-term damage.
- Not Drying Thoroughly: Rushing the drying process is a recipe for disaster. Any lingering moisture can lead to rust on metal parts or electrical malfunctions. Always allow ample time for complete drying, and if possible, a brief air-dry period.
- Ignoring Safety Precautions: Always power off and unplug your hoverboard before cleaning to prevent accidental activation and ensure your personal safety.
> “The secret to a long-lasting hoverboard isn’t just about how you ride it, but how you care for it. Gentle cleaning agents and meticulous drying are your hoverboard’s best friends.” – Admin, reviewsachhn.com, Hover Board Maintenance Specialist
Maintaining Your Hoverboard for Longevity
Beyond just cleaning the wheels, adopting a holistic approach to hoverboard maintenance will significantly extend its life and ensure consistent performance.
Regular Cleaning Schedule
Consistency is key. Aim for a basic wipe-down and debris removal after every few rides, or at least weekly, especially if you ride frequently or on varied terrains. A more thorough, deep cleaning, focusing on all accessible surfaces and tight spots, should be performed monthly. This routine prevents significant buildup and allows you to catch minor issues before they become major problems.
Proper Storage
How you store your hoverboard dramatically impacts its longevity. Always store it in a cool, dry place away from direct sunlight, extreme temperatures (both hot and cold), and moisture. Dust and dirt covers can also protect it from environmental elements when not in use. Avoid storing it outdoors or in damp basements where humidity can damage electronics.
Battery Care
While not directly related to wheel cleaning, proper battery maintenance is vital for overall hoverboard health. Always use the original charger to avoid damage. Avoid overcharging the battery by unplugging it once fully charged. If storing your hoverboard for an extended period, ensure the battery is charged to around 50-70% to prevent deep discharge, which can reduce battery life. Check the battery level periodically and recharge if needed, typically every two months.
Conclusion
Maintaining your hoverboard’s wheels is a simple yet crucial aspect of ownership that guarantees a safe, enjoyable, and enduring ride. By consistently following these detailed steps—from safely powering down and removing debris to gentle scrubbing with mild solutions and meticulous drying—you can prevent common issues like reduced performance and premature wear. Prioritizing regular cleaning not only extends the life of your hoverboard but also ensures that every journey is as smooth and thrilling as the first. A well-maintained hoverboard is a reflection of responsible ownership and a commitment to sustained adventure. How will a clean set of wheels inspire your next ride?
Frequently Asked Questions
Can I use household cleaning sprays or strong detergents to clean my hoverboard wheels?
No, it is highly recommended to only use mild soap mixed with warm water. Harsh household cleaners, sprays, and strong detergents can contain chemicals that can damage the rubber, plastics, and sensitive electronic components of your hoverboard.
How often should I clean my hoverboard wheels?
For optimal performance and longevity, perform a basic cleaning (removing loose debris and wiping down) weekly or after every few rides. A more thorough, deep cleaning, including scrubbing with soap and water, should be done at least once a month.
What should I do if water accidentally gets inside my hoverboard’s wheel hub during cleaning?
If you suspect water has entered the internal components, immediately power off the hoverboard and do not attempt to turn it back on. Thoroughly dry the exterior, and if the issue persists or you notice malfunctions, seek professional repair services to prevent further damage.
Are alcohol-free baby wipes safe to use for quick cleaning of hoverboard wheels?
Yes, alcohol-free and non-abrasive baby wipes can be a convenient option for a quick, superficial wipe-down to remove light dust and grime between deeper cleans. Always ensure they are completely free of alcohol and harsh chemicals.
What is the best way to clean very muddy hoverboard wheels after riding off-road?
For very muddy wheels, first allow the mud to dry slightly, then use a stiff-bristled brush or a plastic scraper to gently remove the large, caked-on chunks. Follow this by scrubbing with warm soapy water and a toothbrush, and always ensure a thorough drying process afterwards.
Frequently Asked Questions
Can I use household cleaning sprays or strong detergents on my hoverboard wheels?
No, it is highly recommended to only use mild soap mixed with warm water. Harsh household cleaners, sprays, and strong detergents can contain chemicals that damage the rubber, plastics, and sensitive electronic components of your hoverboard, leading to costly repairs.
How often should I clean my hoverboard wheels for optimal performance?
For optimal performance and longevity, perform a basic cleaning (removing loose debris and wiping down) weekly or after every few rides. A more thorough, deep cleaning, including scrubbing with soap and water, should be done at least once a month to prevent significant buildup.
What should I do if water accidentally gets inside my hoverboard's wheel hub?
If you suspect water has entered the internal components, immediately power off the hoverboard and do not attempt to turn it back on. Thoroughly dry the exterior, and if the issue persists or you notice malfunctions, seek professional repair services to prevent further damage to the electronics.
Are alcohol-free baby wipes safe for quick cleaning of hoverboard wheels?
Yes, alcohol-free and non-abrasive baby wipes can be a convenient option for a quick, superficial wipe-down to remove light dust and grime between deeper cleans. Always ensure they are completely free of alcohol and harsh chemicals to protect the hoverboard's materials.
What is the best method to clean very muddy hoverboard wheels after off-road riding?
For very muddy wheels, first allow the mud to dry slightly, then use a stiff-bristled brush or a plastic scraper to gently remove the large, caked-on chunks. Follow this by scrubbing with warm soapy water and a toothbrush, and always ensure a thorough drying process afterwards to prevent corrosion.
How to Clean Your Hoverboard Wheels Safely at Home
This guide provides a step-by-step process for safely cleaning your hoverboard wheels at home, ensuring optimal performance and extending the life of your device.
Always turn off your hoverboard and unplug it from any charging source before cleaning. Place it on a stable, flat surface to prevent accidental activation or movement, ensuring safety for both you and the device.
Remove any large, loose debris like dirt, hair, or pebbles from the wheels using a soft brush, dry microfiber cloth, or compressed air. This prevents abrasive materials from scratching the wheels during wet cleaning.
Mix a few drops of mild soap, such as dish soap, with warm water in a small bowl. Avoid harsh chemicals, abrasive cleaners, or industrial solvents, as these can damage the hoverboard's components and rubber.
Dip a damp (not dripping wet) microfiber cloth or toothbrush into the soapy water and gently scrub the wheel treads, sidewalls, and edges. Use light pressure to loosen grime and avoid saturating the wheels to protect internal electronics from water damage.
Wipe down the wheels with a clean, damp microfiber cloth to remove all soap residue, repeating until clean. Immediately dry the wheels meticulously with a dry towel, followed by a brief air-dry period, to prevent corrosion and electrical malfunctions from residual moisture.
Get our weekly buyer guide
Practical specs, not advice. Unsubscribe anytime.
I’ve always worried about damaging my hoverboard when cleaning it, but the advice on safely powering off the device before starting was really helpful. It gave me the confidence to properly scrub the wheels. I can already feel the difference in grip and stability when I ride.
The steps for cleaning the wheels were pretty clear, especially the part about removing loose debris first. My only complaint is that it took me a bit longer than 30 minutes to really get into all the nooks and crannies of the wheel bearings. Still, it’s good to know I’m preventing costly repairs down the line.
I used to just wipe down my hoverboard, but after reading about how dirt affects battery efficiency, I decided to try a more thorough clean. The mild soap solution tip worked wonders! My board feels smoother and I swear the battery is lasting longer now. Definitely worth the 30 minutes.
This guide is a lifesaver! I never realized how much grime buildup could impact performance. Following the steps, especially the thorough drying of all components, made a huge difference. My hoverboard rides like new again, and I’m confident it will last much longer.