A hoverboard that won’t balance can often be fixed with simple DIY troubleshooting steps, such as recalibrating the internal sensors, checking the battery charge, inspecting foot pads, and examining tire pressure. Many common balancing problems stem from misaligned gyroscopes, low battery power, or issues with pressure sensors, all of which can be addressed at home with basic tools like a Phillips screwdriver and a cleaning cloth.
Why Your Hoverboard Isn’t Balancing: Common Causes
Before diving into repairs, understanding the root cause of your hoverboard’s balance problem is the first crucial step. Several factors can throw your device off kilter, ranging from simple fixes to more complex internal issues.
Firstly, misaligned internal sensors are a primary culprit. Over time, bumps, drops, or even regular use on uneven surfaces can cause the gyroscopes and accelerometers inside your hoverboard to lose their precise calibration, leading to erratic balancing behavior. Secondly, a low battery can often manifest as balancing difficulties; insufficient power supply can lead to inconsistent motor function and instability. Thirdly, the foot pads and their underlying pressure sensors are critical for detecting your weight distribution. If these are dirty, worn, or damaged, the hoverboard may not register your commands correctly, causing a loss of balance. For see our hoverboard sales recommendations on this site.
Beyond these, internal mechanical issues like loose wiring connecting the motors, gyroscopes, or motherboard can disrupt critical communication signals. Damaged or worn tires, or even uneven tire pressure, can physically tilt the board. Lastly, software glitches or outdated firmware, much like any smart device, can sometimes lead to unexpected operational problems, including balance instability. Identifying which of these issues you’re facing will guide you toward the most effective solution.
Essential Tools for Hoverboard Repair
Tackling hoverboard balance issues often requires a few basic tools. Having these readily available will make the diagnostic and repair process much smoother and more efficient. For most common DIY fixes, you won’t need specialized equipment, but rather common household items and perhaps one or two simple electronics tools.
You’ll definitely need a flat, level surface to perform calibration and inspections. A small Phillips screwdriver is essential for opening the hoverboard casing to inspect internal components. A soft, clean cleaning cloth and a small amount of isopropyl alcohol will be useful for cleaning sensors and internal parts. If your hoverboard has inflatable tires, a tire pressure gauge and a bicycle pump or air compressor adapter will be necessary. For more advanced troubleshooting, particularly when checking electrical connections, a multimeter can be invaluable, though it’s often optional for initial diagnostics. to always work in a well-lit area and keep all removed screws organized to prevent loss.
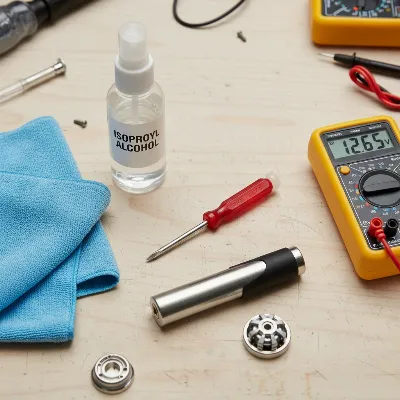 Essential tools laid out for DIY hoverboard repair, including screwdrivers, cleaning cloth, and multimeter.
Step-by-Step DIY Fixes for Balance Issues
When your hoverboard isn’t balancing, a systematic approach to troubleshooting can help pinpoint and resolve the issue quickly. Start with the simplest and most common fixes before moving on to more intricate internal inspections.
1. Recalibrate Your Hoverboard
|
Our Picks for the Best Hover Board in 2026
As an Amazon Associate I earn from qualifying purchases.
|
||
| Num | Product | Action |
|---|---|---|
| 1 | LIEAGLE Hoverboard, 6.5" Self Balancing Scooter Hover Board with Bluetooth Wheels LED Lights for Kids Adults |

|
| 2 | Razor Hovertrax 2.0 Hoverboard, UL2272 Certified Self-Balancing Hoverboard Scooter, for Kids Age 8+ |
|
| 3 | INMOTION E20 Electric Unicycle Hoverboard for Beginners – 14" Wheel, 900W Motor, 18.6 Miles Range, 12.5mph, UL2272 Certified – Lightweight & Safe Self-Balancing Scooter |
|
| 4 | K1 Go-Kart Seat Attachment for Self-Balancing Scooters, Adjustable Frame Fits 6.5"/8"/10" Boards, Easy Install, Kids & Family Fun (Scooter Not Included)–Classic Black |
|
| 5 | Self Balance Scooter Seat Attachment 6.5” Two-Wheel Self Balancing Electric Scooter with LED Light Flash Lights Wheels |
|
| 6 | K2 Self-Balancing Scooter Go Kart with Rear Shock Absorption, Balancing Scooter Seat Attachment for 6.5" 8" 10" Tires, Adjustable Length & Off-Road Wheel( (Not Including Balancing Scooter) |
|
| 7 | 8.5” All Terrain Hover Board, Off Road Self Balancing Scooter with Bluetooth and LED Lights, UL2272 Safety Certified |
|
| 8 | Hover-1 My First Self Balancing Scooter for Kids with 5 mph Max Speed, Dual 150W Motors, 6.3” Tires, 3 Miles Max Range, and LED Headlights |
|
| 9 | Self-Balancing Scooter Skin Hoverboard Sticker Adult e Scooter Electric Scooter for Adults Reflective |
|
| 10 | Gyroor Self Balancing Scooters Seat Attachment - Go Kart Conversion for 6.5'' to 10'' Self Balancing Scooters, Adjustable Frame Length, Perfect for Kids and Adults |
|
Calibration is often the quickest and most effective solution for hoverboards that won’t balance, as it resets the internal gyroscopes and sensors.
To begin, place your hoverboard on a completely flat and level surface, such as a concrete floor or hardwood, ensuring both wheels are flat on the ground and the footpads are parallel to the surface. It’s crucial to avoid carpets or uneven ground during this step. Next, make sure the hoverboard is completely powered off. Press and hold the power button for approximately 5 to 15 seconds until you hear a beep or see the LED lights flash. Different models may have slightly varying timings, so consult your manual if unsure. Release the power button and allow the hoverboard to sit undisturbed for about 10 to 30 seconds while the lights continue to flash. Finally, turn the hoverboard off again, wait a few seconds, then power it back on to test the calibration. A successful calibration will typically result in the hoverboard feeling level and responsive when you step on it. Ensure the battery has at least a 50% charge before attempting calibration, as low power can interfere with the process.
2. Check and Charge the Battery
A surprisingly common reason for erratic hoverboard behavior, including balancing problems, is simply a low or faulty battery.
Always ensure your hoverboard is fully charged before use. A weak or dying battery can cause inconsistent power delivery to the motors and sensors, leading to instability, wobbling, or even sudden shutdowns. Plug in your charger and allow the hoverboard to charge for the recommended time, usually 2-3 hours, or until the charging indicator light changes to green. Avoid riding the hoverboard while it’s charging. If the hoverboard charges but still shows balance issues, or if the charging light indicates a problem (e.g., staying green when not fully charged), the battery itself might be defective. In such cases, a battery replacement may be necessary, which is a more advanced DIY task or one best left to professionals. Regular charging habits, avoiding complete drainage, and preventing overcharging can prolong battery life and prevent these balance-related power issues.
3. Inspect Foot Pads and Pressure Sensors
The foot pads are crucial interfaces that detect your presence and weight distribution, signaling the hoverboard’s motors. Issues here can directly impact balance.
Carefully inspect both foot pads for any visible signs of damage, such as cracks, tears, excessive wear, or dirt and debris stuck underneath. Foreign objects or accumulated grime can prevent the pressure sensors from accurately reading your weight. Use a soft, clean cloth, possibly dampened with a small amount of isopropyl alcohol, to gently clean the surface and edges of the foot pads. Ensure there’s no obstruction that could cause one pad to be unevenly depressed. If the pads themselves appear damaged or worn, they might need to be replaced. Some hoverboards allow for relatively easy replacement of the foot pad sensors, which can be purchased online. If one side of the board consistently registers pressure incorrectly, even after cleaning and calibration, a faulty foot pad sensor is a strong possibility.
4. Examine Tires and Tire Pressure
While often overlooked, the condition and inflation of your hoverboard’s tires can significantly affect its ability to maintain balance.
For hoverboards with pneumatic (air-filled) tires, uneven tire pressure is a frequent cause of tilting or instability. Use a tire pressure gauge to check the PSI of both tires and inflate them to the manufacturer’s recommended level, which can usually be found in your user manual or on the tire sidewall itself. Ensure both tires have identical pressure. Beyond inflation, visually inspect the tires for any signs of uneven wear, punctures, or damage. A visibly worn or damaged tire on one side can cause the hoverboard to lean or pull. If you find significant damage, replacing the tire may be necessary. For optimal balance and performance, it’s often recommended to replace both tires simultaneously to ensure consistent tread and wear patterns.
5. Look for Loose Wires (Internal Inspection)
If external checks and calibration don’t resolve the balancing problem, the issue might lie within the hoverboard’s internal wiring. This step requires careful disassembly.
First and foremost, prioritize safety: turn off the hoverboard completely and disconnect it from any charger. Use a small Phillips screwdriver to carefully remove the screws securing the bottom casing of your hoverboard. Once opened, visually inspect all accessible wires and connectors. Pay close attention to the wires connecting the motors to the main control board, the gyroscope sensors to the mainboard, and any motherboard connections. Look for any wires that appear loose, frayed, disconnected, or pinched. Gently yet firmly reconnect any loose connectors, ensuring they are seated properly. If you find any visibly damaged or frayed wires, these may need to be repaired or replaced. Take photos before disconnecting anything to help you where each wire belongs during reassembly. If you are uncomfortable with this step, or if your hoverboard is under warranty, consider professional assistance.
6. Troubleshoot the Gyroscope
The gyroscope is the “brain” of your hoverboard’s balancing system. If it’s malfunctioning, the board will struggle to stay upright.
After trying calibration, battery checks, and inspecting foot pads and wiring, if your hoverboard still won’t balance, a faulty gyroscope is a strong possibility. Within the hoverboard casing (accessed as in the “Loose Wires” step), locate the gyroscope boards, typically small circuit boards connected to the main control board. First, check their connections for any looseness and ensure they are securely fastened. If the connections are sound, but the problem persists, the gyroscope itself might be faulty. A malfunctioning gyroscope can lead to one side of the hoverboard failing to respond, constant vibrations, or a complete inability to balance. Replacing a gyroscope is a more involved DIY repair, often requiring soldering or specific replacement parts compatible with your hoverboard model. Due to the complexity, some riders may prefer to consult a professional technician for gyroscope diagnosis and replacement.
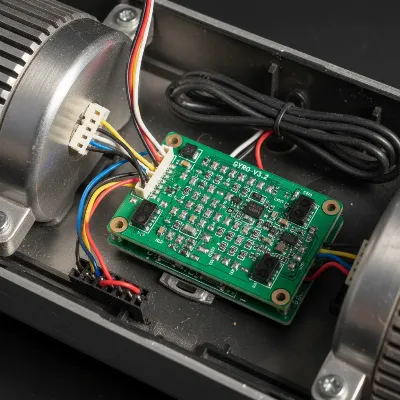 A close-up view of a hoverboard’s internal gyroscope board with wires connected.
7. Update Firmware (If Applicable)
Some modern hoverboards come with companion mobile applications that allow for firmware updates. Software glitches can sometimes cause balance anomalies.
If your hoverboard model has Bluetooth connectivity and a dedicated app, check the app for any available firmware updates. Manufacturers often release updates to improve performance, fix bugs, and enhance safety features. Connect your hoverboard to the app and follow the on-screen instructions to download and install the latest firmware. Ensure your hoverboard has sufficient battery charge before starting any update to prevent interruptions that could brick the device. After the update, recalibrate your hoverboard as described in step one and test its balance. This step is less common for balance issues compared to mechanical fixes but can resolve underlying software conflicts that affect sensor interpretation.
When to Seek Professional Help
While many hoverboard balance issues can be resolved with DIY fixes, there are instances when it’s safer and more practical to consult a professional. Knowing when to stop your own troubleshooting efforts can save you time, prevent further damage, and ensure your safety.
You should seek professional help if, after trying all the above DIY steps, your hoverboard still exhibits persistent balancing problems. This is particularly true if you encounter burning smells or smoke emanating from the device, which could indicate a serious electrical fault. If the hoverboard behaves erratically even when powered off, or if components feel excessively hot during use, immediately discontinue use and consult an expert. If you notice specific error codes flashing that you cannot clear or diagnose, a professional will have the specialized tools and knowledge to interpret these and perform complex repairs, such as motherboard or battery management system replacements. Never attempt repairs that go beyond your comfort level or technical expertise, especially if it involves high-voltage components.
Maintaining Your Hoverboard for Lasting Balance
Preventing balance issues is always better than fixing them. Regular maintenance and mindful riding habits can significantly extend your hoverboard’s lifespan and ensure consistent performance.
Firstly, proper storage is key. Always store your hoverboard in a cool, dry place, away from extreme temperatures and direct sunlight, as these can degrade battery health and internal electronics. Secondly, avoid riding on rough or uneven surfaces whenever possible. Frequent impacts and vibrations from challenging terrain are a major cause of sensor misalignment and loose internal wiring. Thirdly, make it a habit to clean your hoverboard regularly, especially around the foot pads and wheels, to prevent dirt and debris buildup from interfering with sensors. Fourthly, adhere to best charging practices: charge the battery after each use, but avoid overcharging or allowing the battery to drain completely, as this can reduce its overall lifespan and performance. Lastly, consider periodically recalibrating your hoverboard every few months, or after any significant bumps or longer periods of disuse, even if you don’t notice immediate balance problems. This proactive approach helps keep the internal sensors aligned and prevents minor issues from escalating.
Buying Guide: Considerations for Reliability and Maintenance
When choosing a hoverboard, opting for a model that prioritizes reliability and ease of maintenance can significantly reduce future balance issues. Investing in quality upfront can save you headaches and repair costs down the line.
Budget
Your budget will naturally influence your hoverboard choices, but it’s important to understand the trade-offs. While entry-level hoverboards are appealing for their lower price point, they may use less durable components, potentially leading to more frequent balance issues or requiring earlier replacements of parts like sensors or batteries. Mid-range to premium hoverboards typically feature higher-quality gyroscopes, more robust internal wiring, and better battery management systems, which contribute to greater stability and longevity. Weighing the initial cost against the potential for future repairs is essential. Sometimes, a slightly higher investment translates into a more reliable and enjoyable ownership experience with fewer unexpected balance problems.
Features
Certain features can enhance a hoverboard’s stability and durability, indirectly minimizing balance-related issues. Look for models with self-balancing technology that automatically keeps the board level when turned on, reducing stress on the sensors. High-quality motor and wheel assemblies are crucial for smooth operation and even weight distribution. While features like Bluetooth speakers and LED lights are fun, prioritize core components like certified battery packs and durable chassis materials that can withstand regular use. Some advanced models offer app connectivity not just for firmware updates, but also for diagnostics, which can be invaluable for identifying sensor issues before they become critical. Consider if the design allows for relatively easy access to internal components for maintenance, should the need arise.
Safety
Safety is paramount, and a well-engineered hoverboard is inherently less prone to failures that cause balance issues. Always check for relevant safety certifications (e.g., UL 2272 in some regions) which indicate that the hoverboard has undergone rigorous electrical and fire safety testing. These certifications often point to a higher overall build quality and more reliable internal components, including those responsible for balance. Ensure the hoverboard has robust foot pads that are securely fastened and provide consistent pressure detection. Avoid models with overly complex or flimsy internal wiring. Good manufacturing standards translate into reliable connections and components, making your hoverboard more stable and less likely to develop unexpected balance problems due to manufacturing defects. Prioritizing certified and well-reviewed brands can significantly reduce your risk of encountering persistent balance issues.
Conclusion
A hoverboard that won’t balance can be a frustrating and unsafe experience, but with the right knowledge and a few simple DIY steps, you can often restore its functionality. From recalibrating misaligned sensors and checking battery levels to inspecting foot pads, tires, and internal wiring, many common issues are within your ability to fix. to always prioritize safety by working on a powered-off device and seeking professional help for complex problems or when uncertain. Regular maintenance, including proper charging, storage, and avoiding rough terrain, will ensure your hoverboard provides countless hours of smooth, balanced riding. Which of these troubleshooting steps will you try first to get your hoverboard gliding perfectly again?
Frequently Asked Questions
Frequently Asked Questions
Why does my hoverboard shake or vibrate when I step on it?
A shaking or vibrating hoverboard often indicates that the pressure sensors under the foot pads are not reading your weight correctly, or that the internal gyroscopes are miscalibrated. Start by recalibrating the hoverboard on a flat surface and ensure there's no debris under the foot pads. Low battery or loose internal wiring can also contribute to this behavior.
Can I ride a hoverboard that is not balancing correctly?
No, it is highly unsafe to ride a hoverboard that is not balancing correctly. An unbalanced hoverboard can lead to falls, injuries, and potential damage to the device itself. Always ensure your hoverboard is fully stable and responsive before attempting to ride it to prevent accidents.
How often should I calibrate my hoverboard for optimal performance?
There's no strict rule for how often to calibrate, but it's a good practice to do so periodically, perhaps every few months, or immediately after any significant impacts, falls, or if you notice any signs of instability or erratic movement. Proactive calibration helps maintain optimal sensor alignment.
What are the common signs of a faulty gyroscope in a hoverboard?
Signs of a faulty gyroscope include one side of the hoverboard becoming unresponsive, the board constantly tilting to one side even on a flat surface, continuous erratic vibrations that don't cease after calibration, or a complete inability for the board to maintain any balance whatsoever when powered on.
Is it safe to open my hoverboard for internal repairs?
Opening your hoverboard can be safe if done carefully, with the device powered off and unplugged. However, it exposes internal electronics, including the battery, which can be dangerous if mishandled. If you are not comfortable with basic electronics or wire connections, it's best to consult a professional to avoid further damage or injury.
Fix a Hoverboard That Won't Balance
This guide provides step-by-step instructions to diagnose and fix common hoverboard balance issues, from recalibration to internal inspections.
Place the hoverboard on a flat, level surface and ensure it's powered off. Press and hold the power button for 5-15 seconds until lights flash, then release. Allow it to sit for 10-30 seconds before powering off and on again to test.
Ensure your hoverboard is fully charged for 2-3 hours until the indicator light turns green. A low or faulty battery can cause instability. If issues persist after charging, the battery may need replacement.
Examine foot pads for damage, dirt, or debris that might interfere with pressure sensor readings. Clean the pads with a soft cloth and isopropyl alcohol. Damaged pads or sensors may require replacement.
For pneumatic tires, check and equalize tire pressure to the manufacturer's recommended PSI using a gauge. Inspect tires for uneven wear, punctures, or damage, which can cause tilting. Replace damaged tires if necessary.
With the hoverboard powered off and unplugged, carefully open the casing with a Phillips screwdriver. Inspect all wires and connectors for looseness, fraying, or disconnections, especially those to motors and gyroscopes. Reconnect any loose wires securely.
Get our weekly buyer guide
Practical specs, not advice. Unsubscribe anytime.
My hoverboard kept acting up, and I suspected it was the battery. I checked the charge like it said, and it was fine, but I still had some issues. I ended up having to really dig into the foot pads to clean them properly, which helped a bit, but it wasn’t a magic fix for everything. Still, good tips to start with.
I was so frustrated with my hoverboard constantly tilting, and I thought I’d have to buy a new one. Following the steps to recalibrate the internal sensors made a huge difference! It’s riding smoothly again, just like when I first got it. Definitely saved me a lot of money and hassle.
Great advice! My son’s hoverboard was totally off balance after a few tumbles. We followed the guide on checking tire pressure and found one was a bit low. Pumping it up made a noticeable improvement in stability. It’s not perfect, but it’s much safer to ride now.
I’ve had my hoverboard for a couple of years, and it started getting really wobbly. I used a Phillips screwdriver to open it up and inspect the pressure sensors, as suggested. Turns out one was a little loose! Tightened it up, and now it feels brand new. So glad I didn’t have to take it to a repair shop.