Fixing a flat hoverboard tire can seem daunting, but with the right tools and a systematic approach, it’s a manageable DIY task. There are typically 5 key steps involved in repairing a flat hoverboard tire, ranging from identifying the puncture to reinflating the tire. Understanding these steps can save you time and money compared to professional repairs, getting you back to riding smoothly.
Identifying the Puncture and Gathering Tools
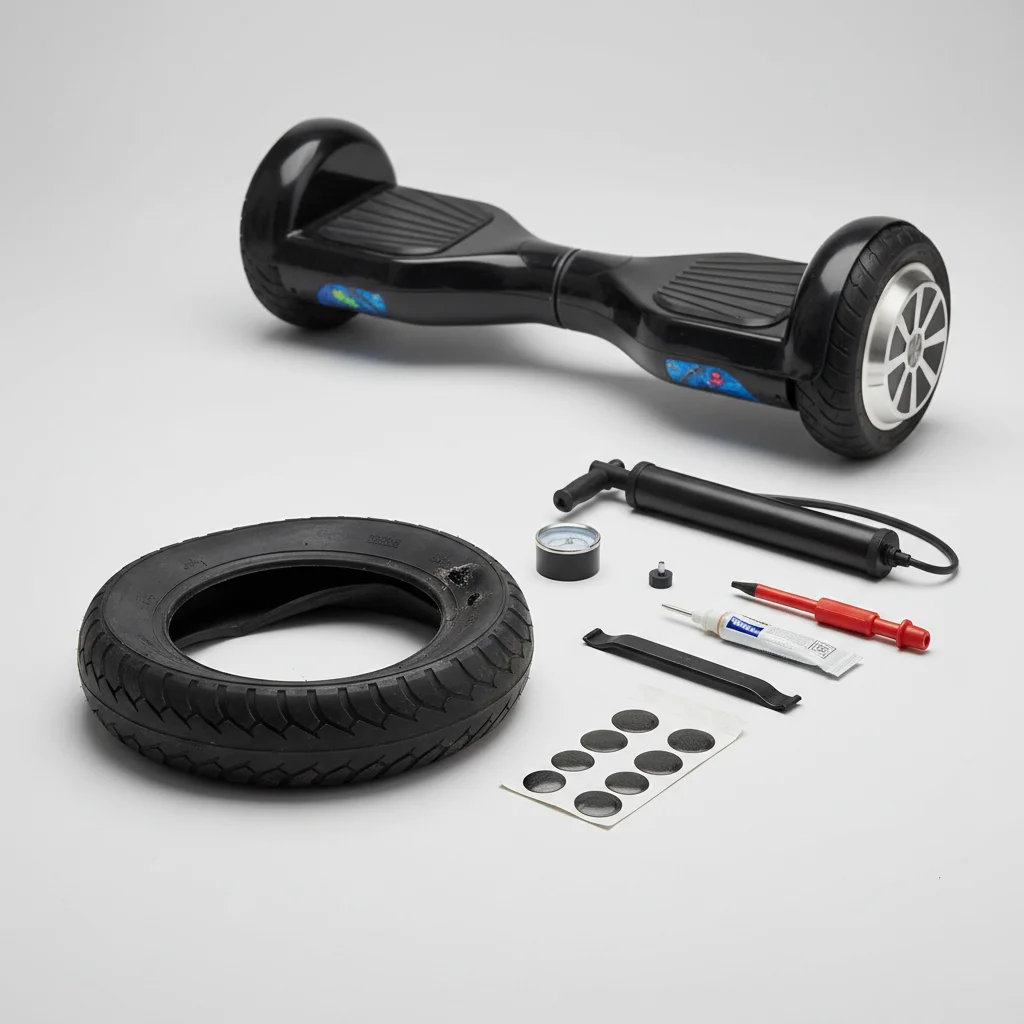
The first crucial step in hoverboard tire repair is accurately locating the puncture. If the tire is completely flat, you might need to inflate it slightly to help with this. A common method is to submerge the tire (or just the affected section) in water and look for air bubbles. Mark the puncture site clearly with a marker. Once the puncture is found, gather your tools. You’ll need tire levers, a patch kit (including sandpaper, rubber cement, and patches), a small wrench or screwdriver (depending on your hoverboard model for wheel removal), and a pump. Ensure your workspace is clean and well-lit. For more hoverboard sales guides on this site.
Removing the Wheel and Tire
To access the tire for repair, you’ll need to remove the wheel from your hoverboard. This usually involves unscrewing a few bolts or nuts that secure the wheel assembly. Carefully detach any wiring connected to the motor if it’s an integrated wheel, making sure to note their positions for reassembly. Once the wheel is off, use tire levers to carefully pry the tire bead away from the rim. Start at one point and work your way around, being gentle to avoid damaging the rim or inner tube. If your hoverboard has a tubeless tire, the process will differ slightly, focusing on the outer tire itself.
Patching the Inner Tube or Tire
|
Our Picks for the Best Hover Board in 2026
As an Amazon Associate I earn from qualifying purchases.
|
||
| Num | Product | Action |
|---|---|---|
| 1 | Hover-1 My First Self Balancing Scooter for Kids with 5 mph Max Speed, Dual 150W Motors, 6.3” Tires, 3 Miles Max Range, and LED Headlights |

|
| 2 | 8.5” All Terrain Hover Board, Off Road Self Balancing Scooter with Bluetooth and LED Lights, UL2272 Safety Certified |
|
| 3 | LIEAGLE Hoverboard, 6.5" Self Balancing Scooter Hover Board with Bluetooth Wheels LED Lights for Kids Adults |
|
| 4 | Razor Hovertrax 2.0 Hoverboard, UL2272 Certified Self-Balancing Hoverboard Scooter, for Kids Age 8+ |
|
| 5 | K1 Go-Kart Seat Attachment for Self-Balancing Scooters, Adjustable Frame Fits 6.5"/8"/10" Boards, Easy Install, Kids & Family Fun (Scooter Not Included)–Classic Black |
|
| 6 | Gyroor Self Balancing Scooters Seat Attachment - Go Kart Conversion for 6.5'' to 10'' Self Balancing Scooters, Adjustable Frame Length, Perfect for Kids and Adults |
|
| 7 | INMOTION E20 Electric Unicycle Hoverboard for Beginners – 14" Wheel, 900W Motor, 18.6 Miles Range, 12.5mph, UL2272 Certified – Lightweight & Safe Self-Balancing Scooter |
|
| 8 | Self Balance Scooter Seat Attachment 6.5” Two-Wheel Self Balancing Electric Scooter with LED Light Flash Lights Wheels |
|
| 9 | K2 Self-Balancing Scooter Go Kart with Rear Shock Absorption, Balancing Scooter Seat Attachment for 6.5" 8" 10" Tires, Adjustable Length & Off-Road Wheel( (Not Including Balancing Scooter) |
|
| 10 | Self-Balancing Scooter Skin Hoverboard Sticker Adult e Scooter Electric Scooter for Adults Reflective |
|
With the inner tube exposed (for pneumatic tires) or the tire itself (for tubeless), it’s time to apply the patch. For inner tubes, lightly sand the area around the puncture to create a rough surface for better adhesion. Apply a thin, even layer of rubber cement to the sanded area and the back of the patch. Allow the cement to become tacky, usually for a few minutes, before firmly pressing the patch onto the puncture. Hold it in place for a minute or two to ensure a strong bond. For tubeless tires, a tire plug kit might be more appropriate, where a sticky plug is inserted directly into the puncture.
Reassembling and Reinflating
Once the patch has cured according to the kit’s instructions, carefully reinsert the inner tube into the tire, making sure it isn’t twisted. Then, work the tire bead back onto the rim using your tire levers, being careful not to pinch the inner tube. Inflate the tire to a low pressure and check for any leaks by listening for hissing or using the water submersion method again. If no leaks are present, inflate the tire to the manufacturer’s recommended pressure. Reattach the wheel to your hoverboard, ensuring all bolts are tightened securely and any wiring is reconnected correctly.
Testing and Final Checks
After reassembly, it’s crucial to perform a thorough test. Gently turn on your hoverboard and check if the wheel spins freely without any rubbing or unusual noises. Take it for a short, slow ride in a safe, open area to ensure the repair holds and the hoverboard maintains its balance and responsiveness. Pay attention to any vibrations or instability. If everything feels normal, your hoverboard tire repair is complete, and you’re ready to enjoy your ride again. Regular tire pressure checks can help prevent future flats.
- Locate the puncture accurately using water or sound.
- Gather all necessary tools like tire levers and a patch kit.
- Carefully remove the wheel and tire from the hoverboard.
- Apply the patch or plug firmly, allowing adequate curing time.
- Reassemble the tire and wheel, then reinflate to proper pressure.
Get our weekly buyer guide
Practical specs, not advice. Unsubscribe anytime.
Excellent guide! I was dreading fixing my hoverboard tire, but the systematic approach outlined here made it feel much less daunting. I appreciated the emphasis on gathering all the right tools beforehand, especially having the tire levers ready. It really does make the whole process smoother and prevents you from having to stop halfway through.
Pretty solid advice here. I had a slow leak and wasn’t sure if I needed a whole new tire or just a patch. The instructions on using a patch kit, especially the part about sandpaper and rubber cement, were clear and effective. My only minor complaint is that getting the tire off with the levers was a bit tougher than expected, but that’s probably just my lack of experience.
This guide was a lifesaver! I thought I’d have to take my hoverboard to a shop, but following the 5 steps made it super easy to fix the flat myself. The tip about submerging the tire in water to find the puncture was genius and really helped me pinpoint the problem quickly. Saved me a ton of money and now my kid is back to riding.
I tried to follow the steps for my hoverboard tire repair, but I had a hard time with the reinflating part. The guide mentioned it, but I wish there was a bit more detail on what kind of pump to use or if there are any specific pressure considerations for hoverboard tires. My tire still feels a little soft after patching it up. It’s a good start though.