There’s nothing quite like the freedom and fun of gliding on a hoverboard, but a dwindling battery can quickly bring the ride to a halt. If your hoverboard isn’t holding a charge as it once did, or simply refuses to power on, replacing the battery yourself can breathe new life into your device without the need for expensive professional repairs. This comprehensive guide will walk you through every crucial step, ensuring you can safely and effectively replace your hoverboard battery at home.
Why Replace Your Hoverboard Battery?
|
Our Picks for the Best Hover Board in 2026
As an Amazon Associate I earn from qualifying purchases.
|
||
| Num | Product | Action |
|---|---|---|
| 1 | Self-Balancing Scooter Skin Hoverboard Sticker Adult e Scooter Electric Scooter for Adults Reflective |

|
| 2 | Razor Hovertrax 2.0 Hoverboard, UL2272 Certified Self-Balancing Hoverboard Scooter, for Kids Age 8+ |
|
| 3 | Gyroor Self Balancing Scooters Seat Attachment - Go Kart Conversion for 6.5'' to 10'' Self Balancing Scooters, Adjustable Frame Length, Perfect for Kids and Adults |
|
| 4 | INMOTION E20 Electric Unicycle Hoverboard for Beginners – 14" Wheel, 900W Motor, 18.6 Miles Range, 12.5mph, UL2272 Certified – Lightweight & Safe Self-Balancing Scooter |
|
| 5 | 8.5” All Terrain Hover Board, Off Road Self Balancing Scooter with Bluetooth and LED Lights, UL2272 Safety Certified |
|
| 6 | K1 Go-Kart Seat Attachment for Self-Balancing Scooters, Adjustable Frame Fits 6.5"/8"/10" Boards, Easy Install, Kids & Family Fun (Scooter Not Included)–Classic Black |
|
| 7 | Hover-1 My First Self Balancing Scooter for Kids with 5 mph Max Speed, Dual 150W Motors, 6.3” Tires, 3 Miles Max Range, and LED Headlights |
|
| 8 | K2 Self-Balancing Scooter Go Kart with Rear Shock Absorption, Balancing Scooter Seat Attachment for 6.5" 8" 10" Tires, Adjustable Length & Off-Road Wheel( (Not Including Balancing Scooter) |
|
| 9 | Self Balance Scooter Seat Attachment 6.5” Two-Wheel Self Balancing Electric Scooter with LED Light Flash Lights Wheels |
|
| 10 | LIEAGLE Hoverboard, 6.5" Self Balancing Scooter Hover Board with Bluetooth Wheels LED Lights for Kids Adults |
|
Hoverboard batteries, primarily lithium-ion, naturally degrade over time, typically lasting 2-3 years or around 300-500 charge cycles depending on usage. If you notice significantly reduced ride times, difficulty holding a charge, unexpected shutdowns, or a complete failure to power on, your battery is likely nearing the end of its life. Beyond performance issues, a failing battery can also pose serious safety risks. Overheating, swelling, or leaking are critical indicators of a compromised battery and should prompt immediate replacement to prevent potential fire hazards.
Understanding Hoverboard Batteries: Types and Compatibility
Before you begin, it’s vital to understand the battery your hoverboard uses to ensure you select a compatible replacement. Most hoverboards are powered by either Lithium-ion (Li-ion) or Lithium Polymer (LiPo) batteries. Li-ion batteries are favored for their high energy density and longevity. However, simply knowing the type isn’t enough; compatibility hinges on several key specifications:
- Voltage (V): Most hoverboards operate on 36V or 42V systems. Matching the voltage is paramount, as an incorrect voltage can damage your hoverboard’s electronics.
- Capacity (Ah): Measured in Ampere-hours, capacity determines how long your hoverboard can run on a single charge. Higher Ah values mean longer ride times.
- Physical Dimensions: Battery compartments vary by hoverboard model. Always measure your existing battery and ensure the replacement fits snugly.
- Connector Type: Hoverboard batteries use specific connectors. Double-check that your new battery’s connector matches the one in your hoverboard.
Always prioritize purchasing a certified replacement battery from a reputable brand, ideally one with safety certifications like UL (Underwriters Laboratories). Using uncertified or generic batteries can lead to compatibility issues, reduced performance, and significant safety risks.
Essential Tools for Battery Replacement
Having the right tools on hand will make the replacement process smoother and safer. Before you start, gather the following:
- Replacement Hoverboard Battery: Ensure it’s compatible with your model.
- Phillips-head Screwdriver: For removing the casing screws.
- Plastic Pry Tool or Spudger: Helps gently open the casing without causing scratches. A flat-head screwdriver can work in a pinch, but be cautious.
- Work Gloves: To protect your hands during handling.
- Anti-static Wrist Strap (Recommended): Prevents static electricity from damaging internal components.
- Small Flashlight (Optional): Helpful for illuminating the internal components.
- Multimeter (Optional): For testing battery voltage if you suspect an issue.
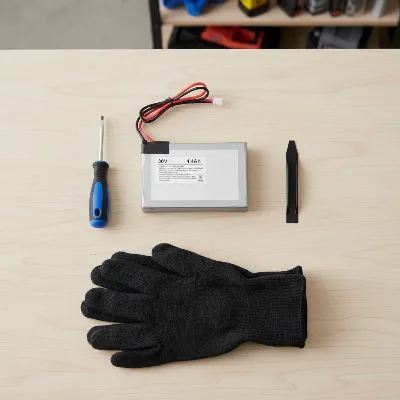 Essential tools laid out for safe hoverboard battery replacement at home, including a screwdriver, plastic pry tool, and protective gloves.
Safety Precautions: Before You Begin
Working with lithium-ion batteries requires utmost caution. Prioritizing safety is non-negotiable to prevent accidents or damage to yourself and your hoverboard.
- Power Off and Unplug: Always ensure your hoverboard is completely turned off and disconnected from its charger before starting. Never attempt repairs while it’s connected to power.
- Work in a Safe Environment: Choose a dry, well-ventilated area away from any flammable materials, water, or extreme temperatures.
- Wear Protective Gear: Put on work gloves and, if available, safety glasses to protect against potential electrical shocks or chemical exposure.
- Handle Swollen Batteries with Extreme Care: If your old battery appears swollen, leaking, or emits a strong odor, handle it with extra caution. These are signs of a dangerous fault. Avoid puncturing or bending it.
- Keep Metal Objects Away: Prevent metal tools from touching battery terminals simultaneously, which could cause a short circuit.
- Have a Fire Extinguisher Ready: A Class D fire extinguisher (for metal fires) is recommended if working with lithium batteries, though a standard ABC extinguisher can also be used for initial containment.
> “Safety is paramount when dealing with lithium-ion batteries. Always err on the side of caution and ensure your workspace is prepared to minimize any risks.”
Step-by-Step Guide: Replacing Your Hoverboard Battery
Follow these steps carefully to ensure a safe and successful battery replacement:
-
Power Down and Prepare:
- Confirm your hoverboard is turned off and unplugged.
- Place the hoverboard upside down on a soft, stable surface (like a blanket or towel) to prevent scratches.
- Gather all your tools within easy reach.
-
Remove the Outer Shell:
- Locate the screws securing the bottom cover of your hoverboard. Depending on the model, there could be 6 to 10 screws.
- Using your Phillips-head screwdriver, carefully remove all screws. Keep them in a safe, organized spot to avoid losing them during reassembly.
- Gently lift off the cover. If it seems stuck, use a plastic pry tool to slowly and carefully separate the shell, checking for any hidden clips or latches. Avoid excessive force to prevent damaging the casing or internal wiring.
-
Locate the Old Battery:
- Once the shell is removed, you’ll see the internal components. The battery pack is typically a rectangular unit, often housed in a central compartment or secured to the frame.
- It will be connected to the mainboard via a wiring harness. Note the orientation and connection points—a quick photo with your phone can serve as a helpful reference for reassembly.
-
Disconnect the Old Battery:
- Carefully locate the battery connector. This is usually a plug-and-socket connection.
- Gently unplug the connector by pulling on the connector itself, not the wires. Avoid pulling on wires as this can cause damage.
- If the battery is further secured with screws or adhesive, remove any screws holding it in place or use your plastic pry tool to gently loosen any adhesive.
- Slowly lift the old battery out of its compartment and set it aside for proper disposal.
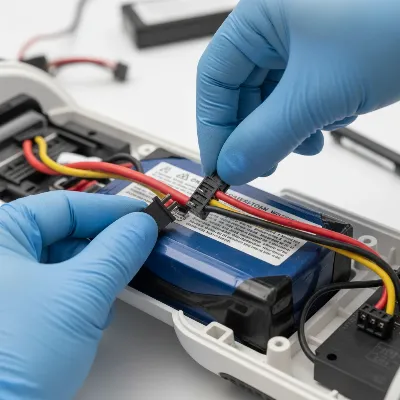 Technician carefully disconnecting an old hoverboard battery from its internal wiring, emphasizing safety.
-
Install the New Battery:
- Place the new, fully charged replacement battery into the compartment, ensuring it’s in the same orientation as the old one.
- Secure the new battery if it requires screws or adhesive.
- Carefully reconnect the wiring harness to the new battery, ensuring a firm and secure connection. Match the colors or pin configurations you observed earlier.
-
Reassemble the Hoverboard:
- Carefully reposition the hoverboard’s outer shell, ensuring all wires are tucked away and not pinched.
- Align the shell with the screw holes.
- Insert and tighten all the screws you removed earlier. Do not overtighten, as this can strip the screw threads or crack the plastic casing.
-
Test the New Battery:
- Once reassembled, turn your hoverboard right side up.
- Power it on to confirm that the new battery is functioning correctly.
- Monitor for any unusual indicator lights or behaviors.
- It’s a good practice to fully charge the hoverboard before its first extended use and allow it to complete a few charge cycles for optimal performance.
Table: Key Specifications for Hoverboard Battery Replacement
To aid in selecting the right replacement battery, consider these crucial specifications:
| Specification | Description | Typical Values | Importance |
|---|---|---|---|
| Voltage (V) | Electrical pressure; must match your hoverboard’s original specification. | 36V, 42V | Critical |
| Capacity (Ah) | Energy storage; higher values mean longer ride times. | 2.0 Ah – 4.4 Ah (or higher) | High |
| Cell Type | Internal cells making up the battery pack. | 18650 Lithium-ion Cells | Medium |
| Connector Type | Physical plug to connect to the hoverboard’s mainboard. | Various (ensure exact match) | Critical |
| Physical Size | Dimensions (length, width, height) to fit the compartment. | Varies by hoverboard model | Critical |
| UL Certification | Indicates safety standards compliance. | UL2271 (for hoverboard batteries) | High |
Tips for Extending Your New Hoverboard Battery’s Lifespan
A new battery is an investment. Here’s how to maximize its lifespan and keep your hoverboard running smoothly:
- Avoid Overcharging: Unplug your hoverboard once it’s fully charged. Leaving it plugged in for extended periods can degrade battery health over time.
- Prevent Deep Discharges: Try to recharge your hoverboard when the battery level drops to 20-30% rather than letting it completely die.
- Store Properly: When not in use, store your hoverboard in a cool, dry place. Extreme heat or cold can negatively affect battery performance and longevity.
- Use the Correct Charger: Always use the charger provided by the manufacturer or a certified, compatible replacement. Incorrect chargers can damage the battery.
- Charge Regularly (Even if Not Used): If you plan to store your hoverboard for an extended period, charge it to about 50-60% every few months to maintain battery health.
Disposing of Your Old Hoverboard Battery Responsibly
Lithium-ion batteries should never be thrown into regular household trash. Improper disposal can harm the environment and pose fire risks due to residual energy.
- Electronic Waste Recycling Centers: The safest and most responsible way to dispose of an old hoverboard battery is to take it to a designated electronic waste recycling center.
- Local Regulations: Check with your local waste management services for specific regulations or programs for hazardous waste and battery recycling in your area.
- Retailer Take-Back Programs: Some retailers that sell hoverboards or batteries may offer take-back programs for recycling old batteries.
Buying Guide: Selecting the Right Replacement Battery
Choosing the correct replacement battery is as crucial as the installation process. Here’s a quick guide to help you make an informed decision:
Budget
The cost of a replacement hoverboard battery can vary significantly based on its specifications, brand, and certifications. While it might be tempting to opt for the cheapest option, remember that battery quality directly impacts safety and performance. Expect to pay anywhere from $50 to $150 or more for a reliable, certified battery. Balancing cost with quality is key; investing in a slightly more expensive, reputable battery can save you headaches and potential hazards down the line.
Features
Beyond basic compatibility, some features can enhance your battery’s safety and performance:
- Battery Management System (BMS): A robust BMS is critical. It protects the battery from overcharging, over-discharging, over-current, and short circuits, significantly improving safety and lifespan.
- Built-in Protection Circuits: These circuits offer additional safeguards against common battery faults.
- Temperature Resistance: Batteries designed to perform well across a range of temperatures can be more durable, especially if you use your hoverboard in varying climates.
Safety Certifications
Always prioritize batteries with recognized safety certifications. The most important for hoverboard batteries is UL2271, which certifies the electrical systems for personal e-mobility devices. This certification ensures the battery has undergone rigorous testing for safety against fire, electrical shock, and other hazards. Looking for this mark on the battery pack or product description provides peace of mind that you are purchasing a safe and reliable component.
Conclusion
Replacing your hoverboard battery at home might seem daunting, but with the right tools, careful attention to safety protocols, and a clear step-by-step approach, it’s a manageable task for most DIY enthusiasts. By selecting a compatible, certified replacement and following these instructions, you can restore your hoverboard’s performance and extend its life, ensuring many more enjoyable rides. Remember, proper battery care and responsible disposal are also essential for both safety and sustainability. Ready to get your hoverboard gliding again?
Frequently Asked Questions
How long do hoverboard batteries typically last?
A standard hoverboard battery generally lasts between 2 to 3 years or approximately 300 to 500 charge cycles, depending on usage frequency and charging habits. Proper care can help maximize its lifespan.
Can I use any hoverboard battery as a replacement?
No, it’s crucial to use a battery that is fully compatible with your hoverboard’s specific model, matching voltage, capacity, physical dimensions, and connector type. Using an incompatible battery can cause damage or safety hazards.
What are the signs that my hoverboard battery needs to be replaced?
Common signs include a significantly reduced ride time, difficulty holding a charge, unexpected shutdowns, slow charging, or visible physical issues like swelling or leaking from the battery pack.
Is it safe to replace a hoverboard battery at home?
Yes, it can be safe if you follow all recommended safety precautions, such as powering off the device, working in a dry and ventilated area, wearing protective gear, and handling the battery with care. If you are unsure at any point, consult a professional.
How should I dispose of my old hoverboard battery?
Old lithium-ion batteries should be taken to a designated electronic waste recycling center or a facility that handles hazardous waste. Never dispose of them in regular household trash due to environmental and safety risks.
Should the new hoverboard battery be fully charged before installation?
It is generally recommended to fully charge the new battery before installation to ensure optimal performance from the start and allow the battery management system to calibrate correctly.
What does UL2271 certification mean for a hoverboard battery?
UL2271 is a safety standard specifically for hoverboard battery systems, certifying that the battery has been tested for safety against fire, electrical shock, and other potential hazards, offering greater assurance of quality and safety.