Hoverboards offer an exhilarating way to glide around, providing both fun and convenient transportation. Yet, even the most advanced models can sometimes feel a bit wobbly or unresponsive, losing their initial smooth balance. This often isn’t a sign of a major malfunction, but rather an indication that your hoverboard’s internal sensors, the very heart of its balancing act, have become misaligned. The good news is that restoring its perfect equilibrium is a straightforward process you can easily perform yourself. This guide will walk you through the simple, safe, and effective steps to recalibrate your hoverboard right in your own home, ensuring a smooth and enjoyable ride every time.
Understanding Why Your Hoverboard Needs Calibration
At the core of every hoverboard are sophisticated gyroscopes and sensors that constantly monitor its tilt and your movements, making instant adjustments to keep you upright. Over time, these delicate internal mechanisms can get out of sync. Common culprits include bumps from uneven terrain, accidental drops, impacts during use, or even just the cumulative effect of regular rides.
When these sensors become misaligned, your hoverboard might start acting erratically. You might notice it drifting unintentionally to one side, feeling unusually wobbly or lopsided, or becoming unresponsive to your subtle shifts in weight. Other tell-tale signs include constant beeping, flashing red indicator lights, or even the board spinning uncontrollably on its own. Recalibrating addresses these issues by resetting the internal gyroscopes and balance sensors, ensuring they accurately respond to your movements, which is crucial for both performance and safety.
Preparing for Calibration: Safety First
Before you begin the calibration process, taking a few preparatory steps will ensure both your safety and the accuracy of the reset.
First, choose a perfectly flat, hard, and level surface for the calibration. Surfaces like tile, concrete, or hardwood are ideal. Avoid carpets, grassy areas, or any uneven ground, as these can interfere with the sensors’ ability to find a true zero point. The goal is for your hoverboard to sit perfectly level, with both footbeds parallel to the floor, before you even start the process.
Next, ensure your hoverboard is completely powered off using its physical power button. If it’s connected to a charger, unplug it. Never attempt calibration with the hoverboard powered on or charging.
Finally, and this is critical, do not place any weight on the hoverboard during the calibration process. It needs to remain completely free of any pressure or leaning to allow its sensors to reset accurately. Briefly inspect the board for any obvious physical damage or loose parts that might hinder its ability to sit level. Addressing any minor issues beforehand can contribute to a more successful calibration.
Step-by-Step Guide to DIY Hoverboard Calibration
Calibrating your hoverboard at home is a simple procedure that takes only a few minutes. Follow these steps carefully:
- Power Down Completely: First, ensure your hoverboard is entirely switched off. Use the physical power button on the board itself, rather than relying solely on a remote control or app if your model has one.
- Position on a Level Surface: Place the hoverboard on the flat, hard surface you prepared. Gently adjust it so that both footbeds (the pads where your feet rest) are perfectly horizontal and parallel to the floor. If one side is tilted slightly, carefully twist the hoverboard body until both sides are visually level.
- Initiate Calibration: With the hoverboard stationary and level, press and hold the power button firmly for approximately 5 to 10 seconds. The exact duration can vary by model; some may require holding for 3-5 seconds, while others, like certain Jetson models, might need up to 15 seconds. You should hear a beeping sound or see the LED lights begin to flash, signaling that the calibration process has started.
- Wait and Let It Reset: Once the lights start flashing or you hear the signal, release the power button. Now, leave the hoverboard completely undisturbed and perfectly level for about 30 seconds. During this time, the internal sensors are realigning and resetting themselves. Avoid touching, moving, or placing any weight on it.
- Power Off Again: After the 30-second waiting period, press the power button once more to turn the hoverboard off. This step is crucial for saving the newly calibrated settings into the hoverboard’s memory.
- Test the Calibration: Turn your hoverboard back on as you normally would. Carefully step onto it in a safe, open area, and take a slow test ride. It should now feel balanced, responsive, and stable, with no drifting or wobbling. If issues persist, repeat the calibration steps one more time.
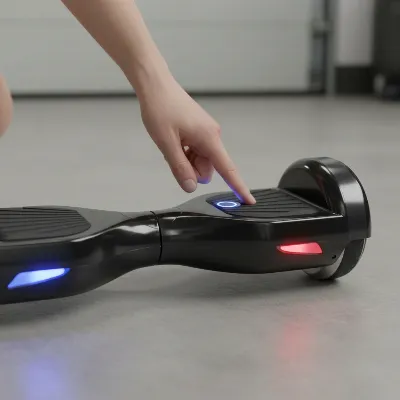 Hands pressing power button on a hoverboard on a level surface with LED lights flashing, illustrating the calibration process.
Advanced Calibration: Using a Smartphone App
For many modern, Bluetooth-enabled hoverboards, calibration can also be performed through a dedicated smartphone application. This method offers an alternative or supplementary way to fine-tune your board’s balance.
If your hoverboard has a companion app:
- Install the App: Ensure you have the correct hoverboard app installed on your smartphone.
- Connect: Pair your hoverboard with the app via Bluetooth.
- Place on Flat Surface: Just like with manual calibration, place your hoverboard on a perfectly flat, level surface.
- Calibrate via App: Navigate through the app’s menu to find an option like “Calibrate Unit,” “Reset Gyroscope,” or a similar setting. Follow any on-screen instructions the app provides. The app will typically guide you through the same principles of keeping the board level and undisturbed during the process.
Maintaining Your Hoverboard for Lasting Balance
While calibration is an excellent fix for balance issues, regular maintenance plays a vital role in preventing problems and extending the life of your hoverboard. Consistent care can help maintain its stability and responsiveness, reducing the frequency with which you might need to recalibrate.
- Regular Cleaning: Keep your hoverboard free from dirt, dust, and debris. Grit can sometimes interfere with moving parts or sensor functionality. Wipe it down regularly, especially after outdoor rides.
- Proper Storage: Store your hoverboard in a cool, dry place, away from extreme temperatures and direct sunlight. Moisture can damage electronic components, and excessive heat can affect battery life and internal circuits.
- Careful Charging: Always use the charger specifically designed for your hoverboard and avoid overcharging. Leaving it plugged in for extended periods after it’s fully charged can degrade the battery over time.
- Gentle Riding: While hoverboards are designed for fun, consistently riding on very rough terrain or enduring frequent hard impacts can gradually misalign the internal sensors. Try to choose smoother paths when possible.
- Periodic Recalibration: Even without obvious issues, performing a quick calibration every few months, or after any particularly vigorous ride, can help maintain optimal performance and keep your hoverboard feeling like new.
Buying Guide Considerations for Hoverboard Longevity
When considering a new hoverboard or evaluating your current one, certain factors contribute to its overall durability and how well it maintains calibration over time. Prioritizing quality components can lead to a more reliable and enjoyable experience.
One of the most crucial aspects is safety certifications, such as UL 2272. This certification ensures that the hoverboard’s electrical system, including its battery and charging components, meets stringent safety standards, which indirectly speaks to the overall quality of its internal electronics, including its gyroscopes and sensors. Hoverboards with higher quality components, particularly well-designed and robust gyroscopes, tend to hold their calibration more effectively and resist misalignment from everyday bumps and use. While the focus here is calibration, choosing a well-built board is an investment in long-term stability and fewer maintenance headaches.
 A person confidently riding a perfectly balanced hoverboard on a smooth paved path in a park setting.
Conclusion
A well-calibrated hoverboard is key to a safe, stable, and truly enjoyable riding experience. By understanding why these devices sometimes lose their balance and knowing how to perform a simple at-home calibration, you’re empowered to keep your ride in top condition. The DIY steps—powering down, placing on a level surface, holding the power button, waiting, and resetting—are straightforward and quickly restore your hoverboard’s precise responsiveness. Remember that consistent maintenance, from proper storage to careful charging, also contributes significantly to your hoverboard’s longevity and performance. Embrace these tips, and you’ll not only enhance your riding adventures but also ensure your hoverboard remains a reliable companion for years to come. What adventures will your perfectly calibrated hoverboard take you on next?
Câu Hỏi Thường Gặp
How often should I calibrate my hoverboard?
|
Our Picks for the Best Hover Board in 2026
As an Amazon Associate I earn from qualifying purchases.
|
||
| Num | Product | Action |
|---|---|---|
| 1 | Hover-1 My First Self Balancing Scooter for Kids with 5 mph Max Speed, Dual 150W Motors, 6.3” Tires, 3 Miles Max Range, and LED Headlights |

|
| 2 | Gyroor Self Balancing Scooters Seat Attachment - Go Kart Conversion for 6.5'' to 10'' Self Balancing Scooters, Adjustable Frame Length, Perfect for Kids and Adults |
|
| 3 | INMOTION E20 Electric Unicycle Hoverboard for Beginners – 14" Wheel, 900W Motor, 18.6 Miles Range, 12.5mph, UL2272 Certified – Lightweight & Safe Self-Balancing Scooter |
|
| 4 | K2 Self-Balancing Scooter Go Kart with Rear Shock Absorption, Balancing Scooter Seat Attachment for 6.5" 8" 10" Tires, Adjustable Length & Off-Road Wheel( (Not Including Balancing Scooter) |
|
| 5 | Self-Balancing Scooter Skin Hoverboard Sticker Adult e Scooter Electric Scooter for Adults Reflective |
|
| 6 | 8.5” All Terrain Hover Board, Off Road Self Balancing Scooter with Bluetooth and LED Lights, UL2272 Safety Certified |
|
| 7 | K1 Go-Kart Seat Attachment for Self-Balancing Scooters, Adjustable Frame Fits 6.5"/8"/10" Boards, Easy Install, Kids & Family Fun (Scooter Not Included)–Classic Black |
|
| 8 | Razor Hovertrax 2.0 Hoverboard, UL2272 Certified Self-Balancing Hoverboard Scooter, for Kids Age 8+ |
|
| 9 | LIEAGLE Hoverboard, 6.5" Self Balancing Scooter Hover Board with Bluetooth Wheels LED Lights for Kids Adults |
|
| 10 | Self Balance Scooter Seat Attachment 6.5” Two-Wheel Self Balancing Electric Scooter with LED Light Flash Lights Wheels |
|
There’s no strict rule, but it’s a good idea to calibrate your hoverboard every few months, or whenever you notice it behaving erratically. If it starts drifting, feeling wobbly, or signaling with flashing lights, it’s definitely time for a recalibration to restore balance and ensure safety.
What if my hoverboard still doesn’t balance after calibration?
If repeating the calibration steps doesn’t resolve the issue, it might indicate a more significant problem. The gyroscopes, motherboard, or motor could be faulty. At this point, it’s recommended to consult the manufacturer’s support or a professional repair service.
Can I calibrate a hoverboard if one side is broken?
No, it’s not advisable to calibrate a hoverboard if it has physical damage, especially if one side is broken or severely compromised. Calibration relies on the board sitting perfectly level and having functional components. Addressing any physical damage should be the priority before attempting calibration.
Are all hoverboards calibrated the same way?
While the general principle is largely consistent across most models (power off, level surface, hold power button), there can be minor variations. Some models might require holding the button for a different duration, or they might have an app-based calibration. Always check your specific hoverboard’s manual for precise instructions.
Is calibration necessary for new hoverboards?
Generally, new hoverboards come factory-calibrated and shouldn’t require immediate calibration. However, if your new hoverboard feels unbalanced or drifts right out of the box, performing a calibration can often resolve these initial issues. It’s always a good first troubleshooting step.