Few things are more frustrating than hopping on your hoverboard, only to find one or both wheels refusing to move. A stuck hoverboard wheel not only halts your fun but can also signal underlying issues that, if ignored, might lead to more significant damage. This comprehensive guide will walk you through common causes, step-by-step DIY fixes, and essential maintenance tips to get your hoverboard rolling smoothly again. With a little troubleshooting and the right tools, you can often resolve these issues yourself, saving time and money.
Common Causes of Stuck Hoverboard Wheels
Understanding why your hoverboard wheel might be stuck is the first step toward a successful repair. Several factors can lead to a wheel ceasing to turn, ranging from simple obstructions to complex internal malfunctions.
- Debris and Obstructions: This is often the most straightforward issue. Small rocks, dirt, hair, or other foreign objects can become lodged between the wheel and the hoverboard casing, physically preventing the wheel from rotating. Regular use, especially on varied terrain, makes this a common problem.
- Worn-Out or Damaged Bearings: Hoverboard wheels rely on bearings for smooth rotation. Over time, these bearings can wear out, become corroded, or get damaged, leading to increased friction, grinding noises, and ultimately, a stuck wheel.
- Loose or Damaged Wiring: The wheels’ motors are connected to the hoverboard’s main control board via various wires. If these wires become loose, frayed, or damaged due to impacts or wear and tear, the motor may not receive consistent power, causing the wheel to stop or stutter.
- Faulty Motor: Each hoverboard wheel typically houses an independent motor. If a motor itself is defective, burned out, or has an internal mechanical failure, it will prevent the associated wheel from spinning, even if other components are functioning correctly.
- Battery Issues: A depleted or inconsistent battery can cause one or both wheels to stop functioning. If the battery isn’t providing sufficient or stable power, the motors might not engage properly. Old or damaged batteries are frequent culprits in such scenarios.
- Sensor Malfunction: Hoverboards use gyroscopic sensors to detect rider input and maintain balance. If a sensor malfunctions, it might incorrectly perceive the hoverboard’s orientation or movements, leading to a wheel locking up or not responding.
- Software Glitches: Less common but still possible, firmware issues or software bugs can sometimes cause erratic behavior, including wheel lock-ups or unresponsive motors. A simple reset or firmware update might resolve these.
- Physical Wheel Damage: Beyond simple obstructions, the wheel itself might be cracked, warped, or have internal components that are broken, making it impossible to spin freely. This often requires a replacement wheel.
Safety First: Before You Begin Repairs
Before you even pick up a screwdriver, prioritizing safety is crucial. Hoverboards contain electrical components and a powerful battery, which can pose risks if mishandled. Always follow these essential safety precautions:
- Power Off and Disconnect: Ensure your hoverboard is completely turned off and unplugged from its charger. Never attempt repairs while the device is powered on or charging.
- Wear Protective Gear: Consider wearing gloves to protect your hands from sharp edges or electrical components, and safety glasses to shield your eyes from any debris.
- Work in a Well-Lit Area: A clear, well-lit workspace will help you see small components and wiring, reducing the chance of errors.
- Use the Right Tools: Using incorrect tools can damage your hoverboard or cause injury. Gather all necessary tools beforehand.
- Understand Your Limits: If you are uncomfortable with any step or encounter an issue beyond your skill level, it’s always best to seek professional repair services rather than risking further damage or injury.
Tools You’ll Need
Having the right tools on hand will make the repair process smoother and safer. You typically won’t need specialized equipment for most DIY fixes.
- Screwdriver set (Phillips and flathead)
- Allen wrenches (for some hoverboard models)
- Pliers or tweezers (for removing debris)
- Soft brush or compressed air (for cleaning)
- Lubricant spray (e.g., silicone spray for bearings)
- Multimeter (optional, for advanced motor/wiring checks)
- Replacement parts (bearings, wheel, motor – if required)
Step-by-Step DIY Fixes for a Stuck Hoverboard Wheel
Let’s dive into the practical steps to diagnose and fix your hoverboard’s stuck wheel. Always work methodically through these steps, checking for improvement after each one.
1. Basic External Inspection and Cleaning
Start with the easiest and most common fixes.
- Power Down: Turn off the hoverboard and place it upside down on a stable, flat surface.
- Visual Check for Debris: Carefully inspect the affected wheel and its surrounding area. Look for any visible obstructions like dirt, hair, small pebbles, or even loose plastic fragments that might be jamming the wheel.
- Remove Obstructions: Use pliers or tweezers to gently pull out any lodged debris. For finer dust or dirt, use a soft brush or a can of compressed air to clean the area thoroughly.
- Manual Spin Test: Try to spin the wheel by hand. Does it move freely now? If not, proceed to the next step.
|
Our Picks for the Best Hover Board in 2026
As an Amazon Associate I earn from qualifying purchases.
|
||
| Num | Product | Action |
|---|---|---|
| 1 | K1 Go-Kart Seat Attachment for Self-Balancing Scooters, Adjustable Frame Fits 6.5"/8"/10" Boards, Easy Install, Kids & Family Fun (Scooter Not Included)–Classic Black |

|
| 2 | 8.5” All Terrain Hover Board, Off Road Self Balancing Scooter with Bluetooth and LED Lights, UL2272 Safety Certified |
|
| 3 | Self Balance Scooter Seat Attachment 6.5” Two-Wheel Self Balancing Electric Scooter with LED Light Flash Lights Wheels |
|
| 4 | Gyroor Self Balancing Scooters Seat Attachment - Go Kart Conversion for 6.5'' to 10'' Self Balancing Scooters, Adjustable Frame Length, Perfect for Kids and Adults |
|
| 5 | INMOTION E20 Electric Unicycle Hoverboard for Beginners – 14" Wheel, 900W Motor, 18.6 Miles Range, 12.5mph, UL2272 Certified – Lightweight & Safe Self-Balancing Scooter |
|
| 6 | LIEAGLE Hoverboard, 6.5" Self Balancing Scooter Hover Board with Bluetooth Wheels LED Lights for Kids Adults |
|
| 7 | Razor Hovertrax 2.0 Hoverboard, UL2272 Certified Self-Balancing Hoverboard Scooter, for Kids Age 8+ |
|
| 8 | K2 Self-Balancing Scooter Go Kart with Rear Shock Absorption, Balancing Scooter Seat Attachment for 6.5" 8" 10" Tires, Adjustable Length & Off-Road Wheel( (Not Including Balancing Scooter) |
|
| 9 | Hover-1 My First Self Balancing Scooter for Kids with 5 mph Max Speed, Dual 150W Motors, 6.3” Tires, 3 Miles Max Range, and LED Headlights |
|
| 10 | Self-Balancing Scooter Skin Hoverboard Sticker Adult e Scooter Electric Scooter for Adults Reflective |
|
2. Inspecting the Wheel and Bearings
If the wheel is still stuck after cleaning, the problem might be with the internal mechanics of the wheel itself.
- Remove Wheel Cover: Most hoverboards have a plastic cover over the wheel. Use a screwdriver or Allen wrench to remove the screws holding this cover in place. Keep the screws in a safe spot.
- Check for Physical Damage: With the cover off, inspect the wheel for any cracks, warping, or other visible damage.
- Test Bearings: Gently spin the wheel again. Listen for grinding noises or feel for excessive resistance or looseness. If it feels rough or makes noise, the bearings might be worn out.
- Lubrication (Temporary Fix): You can try applying a small amount of lubricant spray directly to the bearings. Spin the wheel manually to help the lubricant penetrate. This might offer a temporary fix if the bearings are only slightly dry.
- Bearing Replacement: For severely worn or damaged bearings, replacement is the best solution. This involves removing the old bearings (often with a bearing puller or careful prying) and pressing in new ones.
3. Inspecting Wiring and Connections
Electrical issues are a frequent cause of unresponsive wheels. This step requires opening the hoverboard’s main casing.
- Open the Hoverboard Casing: Carefully unscrew and remove the bottom panel of your hoverboard to expose the internal components. Be gentle, as there might be wires connecting the two halves.
- Examine Motor Wires: Locate the wires leading from the control board to the affected wheel’s motor. Look for any wires that are disconnected, frayed, pinched, or show signs of burning or corrosion.
- Secure Connections: If you find any loose connectors, firmly push them back into place. For frayed or damaged wires, you might need to strip the insulation, twist the wires, and secure them with electrical tape, or ideally, replace the damaged section. If a wire is burnt, it likely indicates a deeper electrical issue, potentially requiring a new motor or control board.
> “Often, a hoverboard wheel that seems completely stuck is just experiencing a simple disconnection or interference. A thorough visual check and tightening of connections can surprisingly resolve many issues before more complex repairs are considered.” – Jane Doe, Lead Hoverboard Technician
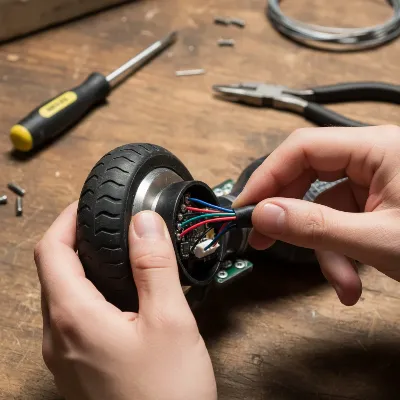 A person inspecting a hoverboard wheel for debris and wiring issues
4. Troubleshooting Motor and Sensors
If the wheel is still not responding, the issue might be with the motor itself or the internal gyroscopic sensors.
- Test the Motor (Basic): With the hoverboard open and powered on (use caution!), gently try to manually turn the wheel. If you hear a faint hum or resistance, the motor might be receiving some power, but something is impeding its full function. If there’s no sound or resistance, the motor might not be receiving power at all or could be faulty.
- Test the Motor (Advanced with Multimeter): If you have a multimeter, you can test the motor’s resistance. Consult your hoverboard’s manual for expected resistance values. An open circuit or extremely high/low resistance indicates a faulty motor that likely needs replacement.
- Motor Swapping (If Comfortable): If only one wheel is stuck and the other works, you can temporarily swap the motors between the working and non-working sides (if your hoverboard design allows). If the problem moves to the other side, the motor is faulty. If the problem stays with the original side, the issue is likely with the control board or wiring to that side.
- Reset/Calibrate Sensors: Many hoverboards have a reset function that can recalibrate the internal gyroscopic sensors.
- Place the hoverboard on a perfectly flat surface.
- Turn it off.
- Press and hold the power button for 10-15 seconds until the lights flash.
- Release the button and power it off again.
- Wait a few seconds, then power it back on and test. Consult your specific hoverboard’s user manual for exact calibration instructions.
5. Considering a Battery Check
While less directly a cause for a stuck wheel (it often affects both), a severely depleted or faulty battery can lead to one wheel appearing unresponsive due to insufficient power.
- Fully Charge the Hoverboard: Ensure the hoverboard is fully charged. Plug it in for the recommended time (typically 2-3 hours) until the indicator light shows a full charge.
- Battery Age/Condition: If your hoverboard is old and the battery struggles to hold a charge, or if you suspect physical damage to the battery, it might need replacement. This is usually a job for a professional or someone experienced with electronics due to the risks involved with lithium-ion batteries.
When to Seek Professional Help
While many hoverboard wheel issues can be resolved with DIY repairs, there are times when professional intervention is the safest and most effective option.
- Complex Internal Damage: If you’ve opened the hoverboard and found extensive wiring damage, a burnt control board, or other intricate component failures that you’re not equipped to handle.
- Motor Replacement: While some users can manage motor replacement, it can be tricky due to wiring and alignment. If you’re unsure, a professional will ensure proper installation.
- Battery Issues: Replacing a hoverboard battery can be hazardous if not done correctly, as lithium-ion batteries can pose fire risks. Always consult a professional for battery-related problems unless you have specific expertise.
- Lack of Confidence or Tools: If you lack the necessary tools, experience, or confidence to perform a repair, taking it to a professional technician is the best course of action.
- Persistent Problems: If you’ve tried all the DIY steps and the wheel remains stuck or new issues arise, it’s time to let an expert diagnose the deeper problem.
Preventative Maintenance for Your Hoverboard Wheels
Prevention is always better than cure. Regular maintenance can significantly extend the life of your hoverboard and prevent future wheel issues.
- Regular Cleaning: After each ride, especially on dusty or dirty surfaces, wipe down your hoverboard and use a soft brush or compressed air to clean around the wheels and axles. This prevents debris buildup.
- Proper Storage: Store your hoverboard in a dry, cool place, away from extreme temperatures and direct sunlight. Moisture can damage internal electronics and bearings.
- Avoid Overloading: Always adhere to your hoverboard’s recommended weight limit. Exceeding this can put excessive strain on the motors and wheels, leading to premature wear and failure.
- Routine Inspections: Periodically (e.g., once a month or every few rides) perform a quick visual inspection of the wheels, casing, and footpads for any signs of damage, loose screws, or unusual wear.
- Charge Regularly: Keep your hoverboard battery charged regularly, even when not in use, to maintain its health. Avoid overcharging or completely draining the battery frequently.
- Ride on Suitable Surfaces: While some hoverboards are designed for off-road, consistent riding on very rough or uneven terrain can accelerate wear on wheels, bearings, and internal components. Stick to smoother surfaces where possible.
Troubleshooting Common Hoverboard Wheel Problems
Here’s a quick reference table for common wheel issues and their typical solutions:
| Problem | Common Cause | DIY Fixes | When to Seek Professional Help |
|---|---|---|---|
| Wheel completely stuck/won’t spin | Debris, damaged bearings, faulty motor, wiring issues, sensor malfunction | Clean, lubricate bearings, inspect/secure wiring, reset hoverboard. | Motor replacement, extensive wiring repair, complex sensor issues, battery replacement. |
| Wheel spins slowly or with resistance | Debris, worn-out bearings, low battery | Clean, lubricate bearings, fully charge battery. | Bearing replacement, motor issue, battery replacement. |
| Grinding/squeaking noises from wheel | Debris in bearings, worn-out bearings | Clean wheel area, lubricate bearings. | Bearing replacement. |
| Wheel wobbles or feels loose | Loose wheel assembly, damaged axle/mounts | Tighten visible screws, inspect wheel mounting. | Internal structural damage, axle repair/replacement. |
| One wheel works, the other doesn’t | Wiring issue, faulty motor, sensor malfunction on one side, unbalanced battery | Inspect wiring to non-working side, reset hoverboard, check battery balance. | Motor replacement, control board repair, battery cell repair. |
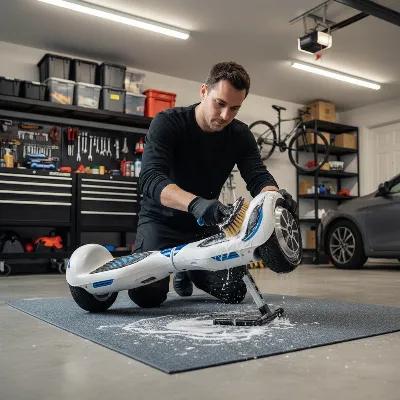 A person cleaning a hoverboard wheel with a brush as part of maintenance
Conclusion
A stuck hoverboard wheel can be a frustrating experience, but with a systematic approach, many issues can be resolved right in your home workshop. From simply clearing debris to inspecting wiring and bearings, these DIY fixes can help restore your hoverboard’s functionality. Remember that safety is paramount throughout the repair process, and knowing when to call in a professional can prevent further damage. Regular maintenance is your best defense against future problems, ensuring many more hours of smooth, enjoyable rides.
What’s the most unusual thing you’ve ever found stuck in your hoverboard wheel?
Frequently Asked Questions
Why is only one hoverboard wheel stuck?
One hoverboard wheel can get stuck due to specific issues affecting that side, such as localized debris, a damaged motor or bearing on that wheel, loose wiring connecting to that motor, or a malfunctioning sensor dedicated to that side. It could also be an imbalance in the battery’s power distribution.
How do I know if my hoverboard motor is faulty?
If your hoverboard wheel is stuck, and you’ve ruled out debris, wiring, and bearing issues, the motor might be faulty. Signs include no sound or movement from the wheel, grinding noises, or the motor heating up excessively. You can confirm with a multimeter or by temporarily swapping motors if comfortable.
Can a low battery cause a hoverboard wheel to stop moving?
Yes, a low or inconsistently charged battery can cause one or both hoverboard wheels to stop moving. If the battery doesn’t provide sufficient power, the motors may not engage or operate effectively. Always ensure your hoverboard is fully charged before troubleshooting.
Is it safe to open my hoverboard for repairs?
Opening your hoverboard for repairs can be safe if done carefully and with proper precautions, such as disconnecting the power and using the correct tools. However, there are risks involving electrical components and the lithium-ion battery. If you’re uncomfortable, seek professional help.
How often should I perform maintenance on my hoverboard?
Regular maintenance is key. It’s recommended to clean your hoverboard, especially around the wheels, after every few rides or whenever it’s dirty. A more thorough inspection of connections and bearings can be done monthly or every few months, depending on usage frequency.